Info Window
An info window is an overlay that displays additional information over a marker or at a specified location on the map. It is usually in the form of a speech bubble displaying text. As the information to be displayed in an info window is specified by an adapter, it can be dynamically updated by using the marker at which an info window will open.
Open and close info windows
An NMFInfoWindow can be created just like a general class object. To open an info window, create an object and set a protocol to create an image resource in the dataSource.
The following code example creates an info window object and sets a protocol.
let infoWindow = NMFInfoWindow()
let dataSource = NMFInfoWindowDefaultTextSource.data()
dataSource.title = "Info window content"
infoWindow.dataSource = dataSource
Swift
let infoWindow = NMFInfoWindow()
let dataSource = NMFInfoWindowDefaultTextSource.data()
dataSource.title = "Info window content"
infoWindow.dataSource = dataSource
Objective-C
NMFInfoWindow *infoWindow = [NMFInfoWindow new];
NMFInfoWindowDefaultTextSource *dataSource = NMFInfoWindowDefaultTextSource.dataSource();
dataSource.title = @"Info window content";
infoWindow.dataSource = dataSource;
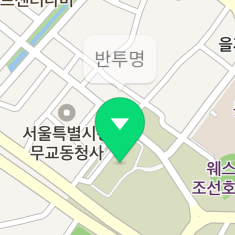
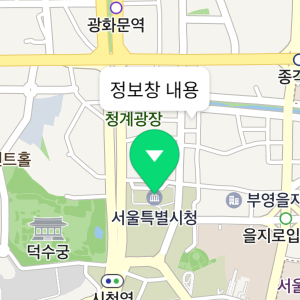
If you call the -openXXX: method, an info window appears. You can add an info window to a marker or coordinates on the map. Call the -openWithMarker: method to add an info window to a marker, or set the position property and call the -openWithMapView: method to open an info window at the specified coordinates. Note that you should specify dataSource before calling the -openXXX: method.
The following code example adds an info window to a marker.
infoWindow.open(with: marker)
Swift
infoWindow.open(with: marker)
Objective-C
[infoWindow openWithMarker:marker];
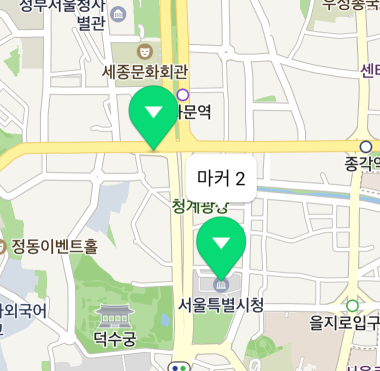
The following figure shows an info window added to a marker.
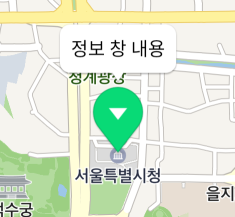
The following code example opens an info window at the specified coordinates.
infoWindow.position = NMGLatLng(lat: 37.5666102, lng: 126.9783881)
infoWindow.open(with: mapView)
Swift
infoWindow.position = NMGLatLng(lat: 37.5666102, lng: 126.9783881)
infoWindow.open(with: mapView)
Objective-C
infoWindow.position = NMGLatLngMake(37.5666102, 126.9783881);
[infoWindow openWithMapView:self.mapView];
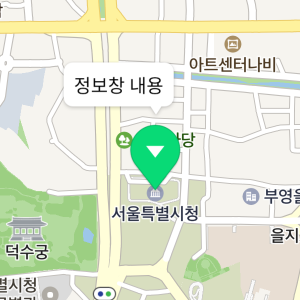
The following figure shows an info window added to the specified coordinates.
Call the -close method to close an info window and make it disappear from the map.
The following code example closes an info window.
infoWindow.close()
Swift
infoWindow.close()
Objective-C
[infoWindow close];
To open an info window at the specified coordinates, you can also use the mapView property, like other overlays, rather than calling -openWithMapView: and -close. Setting a map object for the map property works the same as calling the -openWithMapView: method, and setting the property to nil works the same as calling the -close method.
The following code example opens an info window at the specified coordinates, by using the mapView property.
infoWindow.position = NMGLatLng(lat: 37.5670135, lng: 126.9783740)
infoWindow.mapView = mapView
Swift
infoWindow.position = NMGLatLng(lat: 37.5670135, lng: 126.9783740)
infoWindow.mapView = mapView
Objective-C
infoWindow.position = NMGLatLngMake(37.5670135, 126.9783740);
infoWindow.mapView = self.mapView;
The following code example closes an info window, by using the mapView property.
infoWindow.mapView = nil
Swift
infoWindow.mapView = nil
Objective-C
infoWindow.mapView = nil;
Interaction with markers and maps
When an info window is added to a marker, it is associated with the marker. The NMFInfoWindow.marker method returns markers where info windows are added, and the NMFMarker.infowindow method returns info windows added to a marker. Using the association between info windows and markers, you can easily implement the most frequently used pattern where an info window opens when the associated marker is tapped and closes when the marker is tapped again or other part of the map is tapped.
The following code example implements the pattern by using the association between markers and info windows and a touch handler.
// Close the info window when the map is tapped.
func didTapMapView(_ point: CGPoint, latLng latlng: NMGLatLng) {
    infoWindow.close()
}

// When a marker is tapped:
let handler = { [weak self] (overlay) -> Bool in
    if let marker = overlay as? NMFMarker {
        if marker.infoWindow == nil {
            // Open the info window if it does not open at the current marker.
            self?.infoWindow.open(with: marker)
        } else {
            // Close the info window if it already opens at the current marker.
            self?.infoWindow.close()
        }
    }
    return true
};

marker1.touchHandler = handler
marker2.touchHandler = handler
marker3.touchHandler = handler
Swift
// Close the info window when the map is tapped.
func didTapMapView(_ point: CGPoint, latLng latlng: NMGLatLng) {
    infoWindow.close()
}

// When a marker is tapped:
let handler = { [weak self] (overlay) -> Bool in
    if let marker = overlay as? NMFMarker {
        if marker.infoWindow == nil {
            // Open the info window if it does not open at the current marker.
            self?.infoWindow.open(with: marker)
        } else {
            // Close the info window if it already opens at the current marker.
            self?.infoWindow.close()
        }
    }
    return true
};

marker1.touchHandler = handler
marker2.touchHandler = handler
marker3.touchHandler = handler
Objective-C
// Close the info window when the map is tapped.
- (void)didTapMapView:(CGPoint)point LatLng:(NMGLatLng *)latlng {
    [self.infoWindow close];
}

// When a marker is tapped:
__block weakSelf = self;
NMFOverlayTouchHandler handler = ^BOOL(NMFOverlay *overlay) {
    NMFMarker *marker = (NMFMarker *)overlay;

    if (marker.infoWindow == nil) {
        // Open the info window if it does not open at the current marker.
        [weakSelf.infoWindow openWithMarker:marker];
    } else {
        // Close the info window if it already opens at the current marker.
        [weakSelf.infoWindow close];
    }

    return true;
};

marker1.touchHandler = handler;
marker2.touchHandler = handler;
marker3.touchHandler = handler;
Data source
The dataSource property specifies a data source protocol for an info window. Unlike other overlays using images, such as a marker, an info window does not have a property to set an image. Instead, it has the dataSource property for which you can set a data source object that returns an image of an info window. Whenever the -openXXX: method is called, the data source method is called to update the content of the info window; you can also call the -invalidate method to explicitly update the content.
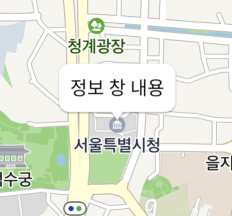
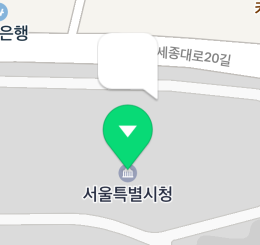
The simplest way to set a data source for an info window is using NMFInfoWindowDefaultTextSource. Just set text to be displayed on the info window in the title, the only property of NMFInfoWindowDefaultTextSource. Set this data source for the info window, then the specified text is displayed in the default speech bubble image.
The following code example uses NMFInfoWindowDefaultTextSource.
let defaultDataSource = NMFInfoWindowDefaultTextSource.data()
defaultDataSource.title = "Info window content"
infoWindow.dataSource = defaultDataSource
Swift
let defaultDataSource = NMFInfoWindowDefaultTextSource.data()
defaultDataSource.title = "Info window content"
infoWindow.dataSource = defaultDataSource
Objective-C
NMFInfoWindowDefaultTextSource *defaultDataSource = [NMFInfoWindowDefaultTextSource dataSource];
defaultDataSource.title = "Info window content"
infoWindow.dataSource = defaultDataSource;
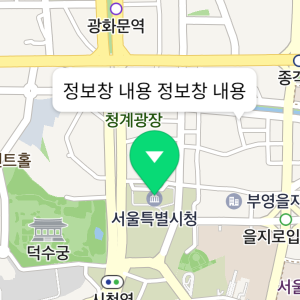
As in the figure below, "Info window content" is displayed on the info window.
You can also implement a view using the NMFOverlayImageDataSource protocol, without using the default speech bubble image.
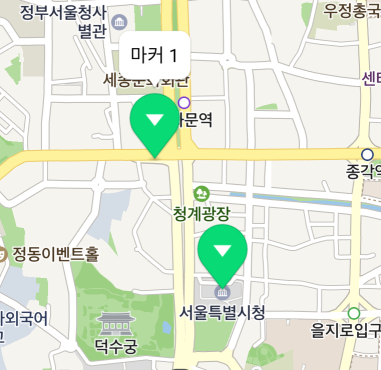
As an info window uses the adapter pattern, you can easily display the information of the marker or coordinates where the info window appears. For example, if you want to show a marker’s property as an info window when the marker is tapped, use only one info window object and make the adapter return the information based on the marker’s property.
The following code example opens an info window at a marker whenever the marker is tapped, and displays tag of userInfo in the info window.
let handler = { [weak self] (overlay) -> Bool in
    if let marker = overlay as? NMFMarker {
        // Display the tag of the marker where the info window opens, as text.
        self?.defaultDataSource.title = marker.userInfo["tag"] as! String
        // Open the info window when the marker is tapped.
        self?.infoWindow.open(with: marker1)
    }
    return true
};
marker1.userInfo = ["tag": "Marker 1"]
marker1.touchHandler = handler
marker2.userInfo = ["tag": "Marker 2"]
marker2.touchHandler = handler
Swift
let handler = { [weak self] (overlay) -> Bool in
    if let marker = overlay as? NMFMarker {
        // Display the tag of the marker where the info window opens, as text.
        self?.defaultDataSource.title = marker.userInfo["tag"] as! String
        // Open the info window when the marker is tapped.
        self?.infoWindow.open(with: marker1)
    }
    return true
};
marker1.userInfo = ["tag": "Marker 1"]
marker1.touchHandler = handler
marker2.userInfo = ["tag": "Marker 2"]
marker2.touchHandler = handler
Objective-C
__block weakSelf = self;
NMFOverlayTouchHandler handler = ^BOOL(NMFOverlay *overlay) {
    NMFMarker *marker = (NMFMarker *)overlay;

    // Display the tag of the marker where the info window opens, as text.
    weakSelf.defaultDataSource.title = marker.userInfo[@"tag"];
    // Open the info window when the marker is tapped.
    [weakSelf.infoWindow openWithMarker:marker];
    return true;
};

marker1.userInfo = @{ @"tag" : @"Marker 1" };
marker1.touchHandler = handler;
marker2.userInfo = @{ @"tag" : @"Marker 2" };
marker2.touchHandler = handler;
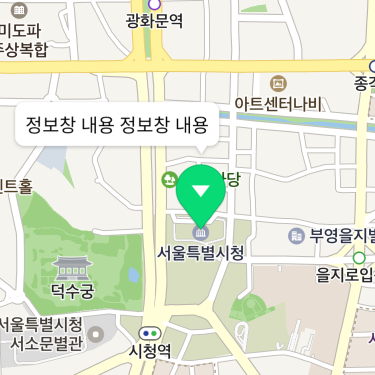
As in the figure below, the information specified for the marker is displayed on the info window whenever the marker is tapped.
Placement
You can specify the alignment of an info window, the image anchor and the gap with the target position, in order to display the info window at the precise location, without using the default speech bubble image.
Alignment
An info window is placed above a marker by default, but you can change the alignment with -openWithMarker:alignType:. There are 9 available options including top, bottom, left, right, diagonal directions and center, which are defined in the NMFAlignType object.
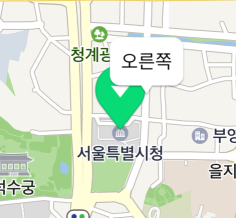
The following code example places an info window on the right side of a marker.
infoWindow.open(with: marker, alignType: NMFAlignType.right)
Swift
infoWindow.open(with: marker, alignType: NMFAlignType.right)
Objective-C
[infoWindow openWithMarker:marker alignType:NMFAlign.right];
The following figure shows an info window placed on the right side of a marker.
Anchor
Using the anchor property, you can make the position indicated by an image match the target position. Anchor is the point on the image that will be placed at the target position. An anchor point is a proportion value where the top left is (0, 0), and the bottom right is (1, 1).
This property is useful when the default background image is not used. For example, if you use an image that has a tail at the bottom right as shown below, the image points to the bottom right but the info window is anchored to the target position based on the point at the bottom of the middle of the image, which makes a gap between the position of the image and that of the info window.
In this case, set the anchor property to (1, 1), which means the bottom right, to clear the difference between the position of the image and that of the info window.
The following code example specifies the anchor of an info window to the bottom right.
infoWindow.anchor = CGPoint(x: 1, y: 1)
Swift
infoWindow.anchor = CGPoint(x: 1, y: 1)
Objective-C
infoWindow.anchor = CGPointMake(1, 1);
The following figure shows the anchor of the info window specified to the bottom right.
Offset
The offsetX and offsetY properties specify the distance between an info window and the target marker or coordinates. Being in pixels, these properties are useful when it is hard to fix the anchor point for an unbalanced image. For example, if you use an image that has a tail at the position 50 px left from the bottom right as shown below, the anchor point changes depending on the size of the content.
In this case, set the anchor to (1, 1), which means the bottom right, and set offsetX to -25 px, to clear the difference between the position of the image and the target position.
The following code example specifies the anchor and offset of an info window in order to place its tail at the proper position even if the image lengthens.
infoWindow.anchor = CGPoint(x: 1, y: 1)
infoWindow.offsetX = -25
Swift
infoWindow.anchor = CGPoint(x: 1, y: 1)
infoWindow.offsetX = -25
Objective-C
infoWindow.anchor = CGPointMake(1, 1);
infoWindow.offsetX = -25;
As in the figure below, the image’s tail is placed at the proper position even if the image lengthens.
Opacity
The alpha property specifies opacity of an info window. The value ranges from 0 to 1, where 0 is fully transparent and 1 is fully opaque. Even though the alpha property is 0, the subjects are still considered to be on the screen, unlike the case where the visible is false. Therefore, they can receive events.
The following code example sets an info window to be semitransparent.
infoWindow.alpha = 0.5
Swift
infoWindow.alpha = 0.5
Objective-C
infoWindow.alpha = 0.5f;
The following figure shows the info window set to be semitransparent.