경로선과 화살표
네이버 지도 SDK는 경로선, 화살표 등 내비게이션 서비스에 특화된 오버레이를 제공합니다.
경로선 오버레이
PathOverlay는 경로선을 나타내는 데 특화된 오버레이입니다. 하나의 선을 나타낸다는 측면에서는 PolylineOverlay와 유사하나, 경로선에 특화된 기능을 갖고 있습니다. 테두리와 패턴 이미지를 적용할 수 있으며 지도를 기울이더라도 두께가 일정하게 유지됩니다. 테두리와 패턴은 자기교차(self-intersection)가 일어나더라도 자연스럽게 나타납니다. 또한 진척률을 지정할 수 있으며, 지나오거나 지나갈 경로에 각각 다른 색상과 테두리를 지정할 수 있습니다. 경로선과 겹치는 마커 및 심벌을 숨길 수도 있습니다.
추가 및 삭제
경로선 오버레이는 일반적인 자바 객체처럼 생성할 수 있습니다. 객체를 생성하고 coords 속성에 좌표열을 지정한 후 map 속성에 지도 객체를 지정하면 경로선 오버레이가 나타납니다. 단, map을 지정하기 전에는 반드시 coords를 지정해야 하며, 그렇지 않으면 예외가 발생합니다.
다음은 경로선 오버레이 객체를 생성하고 지도에 추가하는 예제입니다.
PathOverlay path = new PathOverlay();
path.setCoords(Arrays.asList(
    new LatLng(37.57152, 126.97714),
    new LatLng(37.56607, 126.98268),
    new LatLng(37.56445, 126.97707),
    new LatLng(37.55855, 126.97822)
));
path.setMap(naverMap);
Java
PathOverlay path = new PathOverlay();
path.setCoords(Arrays.asList(
    new LatLng(37.57152, 126.97714),
    new LatLng(37.56607, 126.98268),
    new LatLng(37.56445, 126.97707),
    new LatLng(37.55855, 126.97822)
));
path.setMap(naverMap);
Kotlin
val path = PathOverlay()
path.coords = listOf(
    LatLng(37.57152, 126.97714),
    LatLng(37.56607, 126.98268),
    LatLng(37.56445, 126.97707),
    LatLng(37.55855, 126.97822)
)
path.map = naverMap
map에 null을 지정하면 지도에서 경로선 오버레이가 사라집니다.
다음은 경로선 오버레이를 지도에서 제거하는 예제입니다.
좌표열
coords 속성을 사용해 좌표열을 지정할 수 있습니다. 좌표열은 필수적인 속성으로, 좌표열을 지정하지 않은 경로선 오버레이를 지도에 추가하면 예외가 발생합니다. 또한 좌표열의 크기가 2 미만이거나 null인 원소가 있을 경우에도 예외가 발생합니다.
다음은 경로선 오버레이의 좌표열을 지정하는 예제입니다.
path.setCoords(Arrays.asList(
    new LatLng(37.57152, 126.97714),
    new LatLng(37.56607, 126.98268),
    new LatLng(37.56445, 126.97707),
    new LatLng(37.55855, 126.97822)
));
Java
path.setCoords(Arrays.asList(
    new LatLng(37.57152, 126.97714),
    new LatLng(37.56607, 126.98268),
    new LatLng(37.56445, 126.97707),
    new LatLng(37.55855, 126.97822)
));
Kotlin
path.coords = listOf(
    LatLng(37.57152, 126.97714),
    LatLng(37.56607, 126.98268),
    LatLng(37.56445, 126.97707),
    LatLng(37.55855, 126.97822)
)
coords 속성에 지정한 좌표열 객체 또는 coords 속성으로 얻어온 좌표열 객체를 변경하더라도 변경 사항이 반영되지는 않습니다. 반영하려면 좌표열 객체를 다시 coords 속성에 지정해야 합니다.
다음은 경로선 오버레이의 좌표열 중 일부를 변경하는 예제입니다.
List<LatLng> coords = new ArrayList<>();
Collections.addAll(coords,
    new LatLng(37.57152, 126.97714),
    new LatLng(37.56607, 126.98268),
    new LatLng(37.56445, 126.97707),
    new LatLng(37.55855, 126.97822)
);
path.setCoords(coords);

coords.set(0, new LatLng(37.5734571, 126.975335));
// 아직 반영되지 않음
path.setCoords(coords);
// 반영됨
Java
List<LatLng> coords = new ArrayList<>();
Collections.addAll(coords,
    new LatLng(37.57152, 126.97714),
    new LatLng(37.56607, 126.98268),
    new LatLng(37.56445, 126.97707),
    new LatLng(37.55855, 126.97822)
);
path.setCoords(coords);

coords.set(0, new LatLng(37.5734571, 126.975335));
// 아직 반영되지 않음
path.setCoords(coords);
// 반영됨
Kotlin
val coords = mutableListOf(
    LatLng(37.57152, 126.97714),
    LatLng(37.56607, 126.98268),
    LatLng(37.56445, 126.97707),
    LatLng(37.55855, 126.97822)
)
path.coords = coords

coords[0] = LatLng(37.5734571, 126.975335)
// 아직 반영되지 않음
path.coords = coords
// 반영됨
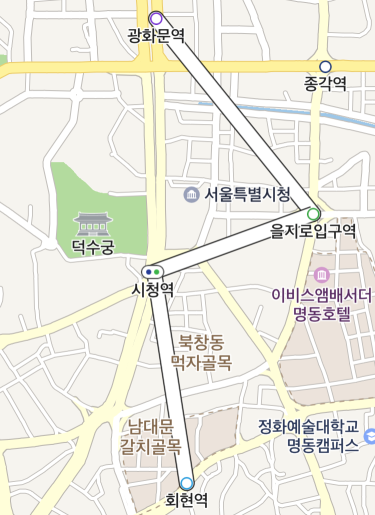
두께
width 속성을 사용해 두께를 지정할 수 있습니다.
다음은 경로선 오버레이의 두께를 30픽셀로 지정하는 예제입니다.
테두리 두께
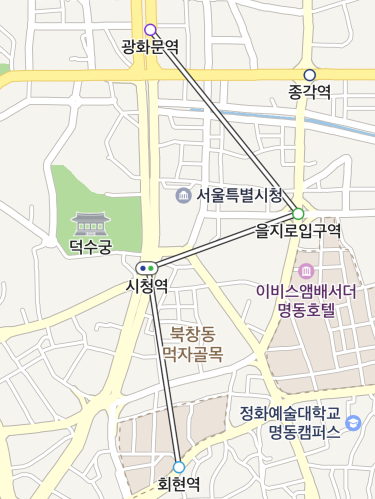
outlineWidth 속성을 사용해 테두리의 두께를 지정할 수 있습니다. 0으로 지정하면 테두리가 그려지지 않습니다.
다음은 경로선 오버레이의 테두리 두께를 5픽셀로 지정하는 예제입니다.
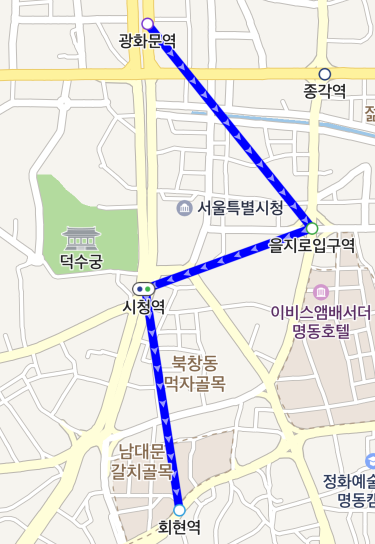
패턴
패턴은 경로선에 일정 간격으로 되풀이되어 나타나는 이미지를 의미합니다. 경로의 진행 방향 등을 표현하는 용도로 유용합니다.
patternImage 속성을 사용해 패턴 이미지를 지정할 수 있습니다. null일 경우 패턴이 그려지지 않습니다. 패턴 이미지를 지정하려면 먼저 OverlayImage 객체를 만들어야 합니다. OverlayImage는 오버레이에서 사용할 수 있는 비트맵 이미지를 나타내는 클래스로, 팩토리 메서드를 이용해 리소스, 에셋, 비트맵, 뷰 등으로부터 인스턴스를 생성할 수 있습니다. 패턴으로 사용할 이미지는 사용자 단말의 DPI(Dots Per Inch)별로 대응해야 하므로 드로어블 리소스를 사용해 만드는 것이 좋습니다.
patternInterval 속성을 사용하면 패턴 이미지 간 간격을 지정할 수 있습니다. 0일 경우 패턴이 그려지지 않습니다.
다음은 경로선 오버레이에 패턴 이미지를 지정하고, 그 간격을 10픽셀로 지정하는 예제입니다.
path.setPatternImage(OverlayImage.fromResource(R.drawable.path_pattern));
path.setPatternInterval(10);
Java
path.setPatternImage(OverlayImage.fromResource(R.drawable.path_pattern));
path.setPatternInterval(10);
Kotlin
path.patternImage = OverlayImage.fromResource(R.drawable.path_pattern)
path.patternInterval = 10
진척률
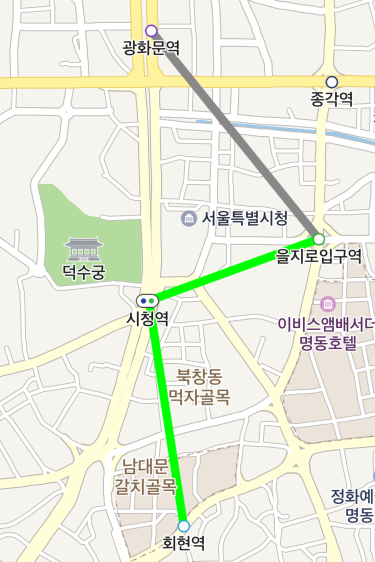
progress 속성을 사용해 진척률을 지정할 수 있습니다. 경로는 진척률을 기준으로 지나온 경로와 지나갈 경로로 구분됩니다. 지나온 구간과 지나갈 구간에 대한 색상을 달리 지정할 수 있으므로 진척률에 따라 좌표열을 변경할 필요가 없습니다. 값의 범위는 -1~1이며 각각 다음과 같은 의미를 갖습니다.
- 양수로 지정하면 첫 좌표부터 진척률만큼 떨어진 지점까지의 선형은 지나온 경로로, 나머지는 지나갈 경로로 간주됩니다.
- 음수로 지정하면 마지막 좌표부터 -진척률만큼 떨어진 지점까지의 선형은 지나온 경로로, 나머지는 지나갈 경로로 간주됩니다.
0으로 지정하면 모든 선형이 지나갈 경로로 간주됩니다.
다음은 경로선 오버레이의 진척률을 50%로 지정하는 예제입니다.
색상
color와 passedColor 속성을 사용해 각각 지나갈, 지나온 경로선의 색상을 지정할 수 있습니다.
다음은 경로선 오버레이의 지나갈 경로선 색상을 녹색으로, 지나온 경로선 색상을 회색으로 지정하는 예제입니다.
path.setColor(Color.GREEN);
path.setPassedColor(Color.GRAY);
Java
path.setColor(Color.GREEN);
path.setPassedColor(Color.GRAY);
Kotlin
path.color = Color.GREEN
path.passedColor = Color.GRAY
테두리 색상
outlineColor와 passedOutlineColor 속성을 사용해 각각 지나갈, 지나온 경로선의 테두리 색상을 지정할 수 있습니다.
다음은 경로선 오버레이의 지나갈 경로선 테두리 색상을 흰색으로, 지나온 경로선 테두리 색상을 녹색으로 지정하는 예제입니다.
path.setOutlineColor(Color.WHITE);
path.setPassedOutlineColor(Color.GREEN);
Java
path.setOutlineColor(Color.WHITE);
path.setPassedOutlineColor(Color.GREEN);
Kotlin
path.outlineColor = Color.WHITE
path.passedOutlineColor = Color.GREEN

경로선과 지도 심벌 및 마커 간 겹침
isHideCollidedSymbols 속성을 true로 지정하면 경로선과 겹치는 지도 심벌이 숨겨집니다.
다음은 경로선과 겹치는 지도 심벌을 자동으로 숨기도록 지정하는 예제입니다.
path.setHideCollidedSymbols(true);
Java
path.setHideCollidedSymbols(true);
Kotlin
path.isHideCollidedSymbols = true
isHideCollidedMarkers 속성을 true로 지정하면 경로선과 겹치는 마커가 숨겨집니다. 마커의 Z 인덱스가 경로선의 Z 인덱스보다 크더라도 경로선이 우선합니다.
다음은 경로선과 겹치는 마커를 자동으로 숨기도록 지정하는 예제입니다.
path.setHideCollidedMarkers(true);
Java
path.setHideCollidedMarkers(true);
Kotlin
path.isHideCollidedMarkers = true
isHideCollidedCaptions 속성을 true로 지정하면 경로선과 겹치는 마커 캡션이 숨겨집니다. 겹치는 마커의 captionAligns에 둘 이상의 방향을 지정했다면 겹치지 않는 첫 번째 방향에 캡션이 나타나며, 어느 방향으로 위치시켜도 겹칠 경우에만 캡션이 숨겨집니다. 단, hideCollidedMarkers가 true로 지정된 경우 hideCollidedCaptions는 무시됩니다. 마커의 Z 인덱스가 경로선의 Z 인덱스보다 크더라도 경로선이 우선합니다.
다음은 경로선과 겹치는 마커 캡션을 자동으로 숨기도록 지정하는 예제입니다.
path.setHideCollidedCaptions(true);
Java
path.setHideCollidedCaptions(true);
Kotlin
path.isHideCollidedCaptions = true
멀티파트 경로선 오버레이
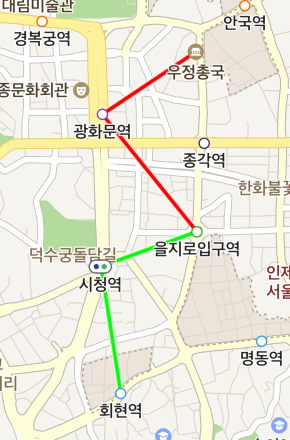
MultipartPathOverlay는 경로선을 여러 파트로 나누어 각기 다른 색상을 부여할 수 있는 특수한 경로선 오버레이입니다. 다양한 색상으로 구성된 경로선을 나타내고자 할 경우 여러 개의 경로선 오버레이를 사용하는 것보다 멀티파트 경로선 오버레이를 사용하는 것이 쉽고 효율적입니다.
추가 및 삭제
멀티파트 경로선 오버레이는 일반적인 자바 객체처럼 생성할 수 있습니다. 객체를 생성하고 coordParts 속성에 좌표열 파트의 목록을, colorParts 속성에 색상 파트의 목록을 지정한 후 map 속성에 지도 객체를 지정하면 멀티파트 경로선 오버레이가 나타납니다. 단, map을 지정하기 전에는 반드시 coordParts와 colorParts를 지정해야 하며, 그렇지 않거나 두 파트의 크기가 다를 경우 예외가 발생합니다.
다음은 멀티파트 경로선 오버레이 객체를 생성하고 지도에 추가하는 예제입니다.
MultipartPathOverlay multipartPath = new MultipartPathOverlay();

multipartPath.setCoordParts(Arrays.asList(
    Arrays.asList(
        new LatLng(37.5744287, 126.982625),
        new LatLng(37.57152, 126.97714),
        new LatLng(37.56607, 126.98268)
    ),
    Arrays.asList(
        new LatLng(37.56607, 126.98268),
        new LatLng(37.56445, 126.97707),
        new LatLng(37.55855, 126.97822)
    )
));

multipartPath.setColorParts(Arrays.asList(
    new MultipartPathOverlay.ColorPart(
        Color.RED, Color.WHITE, Color.GRAY, Color.LTGRAY),
    new MultipartPathOverlay.ColorPart(
        Color.GREEN, Color.WHITE, Color.DKGRAY, Color.LTGRAY)
));

multipartPath.setMap(naverMap);
Java
MultipartPathOverlay multipartPath = new MultipartPathOverlay();

multipartPath.setCoordParts(Arrays.asList(
    Arrays.asList(
        new LatLng(37.5744287, 126.982625),
        new LatLng(37.57152, 126.97714),
        new LatLng(37.56607, 126.98268)
    ),
    Arrays.asList(
        new LatLng(37.56607, 126.98268),
        new LatLng(37.56445, 126.97707),
        new LatLng(37.55855, 126.97822)
    )
));

multipartPath.setColorParts(Arrays.asList(
    new MultipartPathOverlay.ColorPart(
        Color.RED, Color.WHITE, Color.GRAY, Color.LTGRAY),
    new MultipartPathOverlay.ColorPart(
        Color.GREEN, Color.WHITE, Color.DKGRAY, Color.LTGRAY)
));

multipartPath.setMap(naverMap);
Kotlin
val multipartPath = MultipartPathOverlay()

multipartPath.coordParts = listOf(
    listOf(
        LatLng(37.5744287, 126.982625),
        LatLng(37.57152, 126.97714),
        LatLng(37.56607, 126.98268)
    ),
    listOf(
        LatLng(37.56607, 126.98268),
        LatLng(37.56445, 126.97707),
        LatLng(37.55855, 126.97822)
    )
)

multipartPath.colorParts = listOf(
    MultipartPathOverlay.ColorPart(
        Color.RED,
        Color.WHITE,
        Color.GRAY,
        Color.LTGRAY
    ),
    MultipartPathOverlay.ColorPart(
        Color.GREEN,
        Color.WHITE,
        Color.DKGRAY,
        Color.LTGRAY
    )
)

multipartPath.map = naverMap
다음은 멀티파트 경로선 오버레이를 지도에서 제거하는 예제입니다.
multipartPath.setMap(null);
Java
multipartPath.setMap(null);
Kotlin
multipartPath.map = null
좌표열 파트
coordParts 속성을 사용해 좌표열 파트의 목록을 지정할 수 있습니다. 좌표열 파트의 목록은 필수적인 속성으로, 좌표열 파트를 지정하지 않은 멀티파트 경로선 오버레이를 지도에 추가하면 예외가 발생합니다. 좌표열 파트의 목록은 좌표열에 대한 리스트, 즉 좌표에 대한 2차원 리스트로 표현됩니다. 목록에는 최소한 하나의 파트가 존재해야 하며 그렇지 않으면 예외가 발생합니다. 또한 각 좌표열 파트의 크기가 2 미만이거나 null인 원소가 있을 경우에도 예외가 발생합니다.
다음은 멀티파트 경로선 오버레이에 두 개의 좌표열 파트를 지정하는 예제입니다.
multipartPath.setCoordParts(Arrays.asList(
    Arrays.asList(
        new LatLng(37.5744287, 126.982625),
        new LatLng(37.57152, 126.97714),
        new LatLng(37.56607, 126.98268)
    ),
    Arrays.asList(
        new LatLng(37.56607, 126.98268),
        new LatLng(37.56445, 126.97707),
        new LatLng(37.55855, 126.97822)
    )
));
Java
multipartPath.setCoordParts(Arrays.asList(
    Arrays.asList(
        new LatLng(37.5744287, 126.982625),
        new LatLng(37.57152, 126.97714),
        new LatLng(37.56607, 126.98268)
    ),
    Arrays.asList(
        new LatLng(37.56607, 126.98268),
        new LatLng(37.56445, 126.97707),
        new LatLng(37.55855, 126.97822)
    )
));
Kotlin
multipartPath.coordParts = listOf(
    listOf(
        LatLng(37.5744287, 126.982625),
        LatLng(37.57152, 126.97714),
        LatLng(37.56607, 126.98268)
    ),
    listOf(
        LatLng(37.56607, 126.98268),
        LatLng(37.56445, 126.97707),
        LatLng(37.55855, 126.97822)
    )
)
coordParts 속성에 지정한 좌표열 객체 또는 coordParts 속성으로 얻어온 객체를 변경하더라도 변경 사항이 반영되지는 않습니다. 반영하려면 객체를 다시 coordParts 속성에 지정해야 합니다.
다음은 멀티파트 경로선 오버레이의 좌표열 중 일부를 변경하는 예제입니다.
List<LatLng> coordPart1 = new ArrayList<>();
Collections.addAll(coordPart1,
new LatLng(37.5744287, 126.982625),
new LatLng(37.57152, 126.97714),
new LatLng(37.56607, 126.98268)
);

List<LatLng> coordPart2 = new ArrayList<>();
Collections.addAll(coordPart2,
new LatLng(37.56607, 126.98268),
new LatLng(37.56445, 126.97707),
new LatLng(37.55855, 126.97822)
);

List<List<LatLng>> coordParts = Arrays.asList(coordPart1, coordPart2);
multipartPath.setCoordParts(coordParts);

coordParts.get(0).set(0, new LatLng(37.5734571, 126.975335));
// 아직 반영되지 않음
multipartPath.setCoordParts(coordParts);
// 반영됨
Java
List<LatLng> coordPart1 = new ArrayList<>();
Collections.addAll(coordPart1,
new LatLng(37.5744287, 126.982625),
new LatLng(37.57152, 126.97714),
new LatLng(37.56607, 126.98268)
);

List<LatLng> coordPart2 = new ArrayList<>();
Collections.addAll(coordPart2,
new LatLng(37.56607, 126.98268),
new LatLng(37.56445, 126.97707),
new LatLng(37.55855, 126.97822)
);

List<List<LatLng>> coordParts = Arrays.asList(coordPart1, coordPart2);
multipartPath.setCoordParts(coordParts);

coordParts.get(0).set(0, new LatLng(37.5734571, 126.975335));
// 아직 반영되지 않음
multipartPath.setCoordParts(coordParts);
// 반영됨
Kotlin
val coordParts = mutableListOf(
    mutableListOf(
        LatLng(37.5744287, 126.982625),
        LatLng(37.57152, 126.97714),
        LatLng(37.56607, 126.98268)
    ),
    mutableListOf(
        LatLng(37.56607, 126.98268),
        LatLng(37.56445, 126.97707),
        LatLng(37.55855, 126.97822)
    )
)
multipartPath.coordParts = coordParts

coordParts[0][0] = LatLng(37.5734571, 126.975335)
// 아직 반영되지 않음
multipartPath.coordParts = coordParts
// 반영됨
색상 파트
colorParts 속성을 사용해 색상 파트의 목록을 지정할 수 있습니다. 색상 파트를 지정하려면 먼저 MultipartPathOverlay.ColorPart 객체를 만들어야 합니다. ColorPart는 하나의 좌표열 파트에 어떤 색상을 부여해야 하는지에 대한 정보를 표현하는 클래스입니다. 지나갈 경로선과 지나온 경로선에 대해서 각각 선의 색상과 테두리의 색상을 지정할 수 있습니다.
다음은 MultipartPathOverlay.ColorPart 객체를 생성하는 예제입니다.
MultipartPathOverlay.ColorPart colorPart = new MultipartPathOverlay.ColorPart(
    Color.RED,   // 지나갈 경로선의 선 색상을 빨간색으로 지정
    Color.WHITE, // 지나갈 경로선의 테두리 색상을 흰색으로 지정
    Color.GRAY,  // 지나온 경로선의 선 색상을 회색으로 지정
    Color.LTGRAY // 지나온 경로선의 테두리 색상을 밝은 회색으로 지정
);
Java
MultipartPathOverlay.ColorPart colorPart = new MultipartPathOverlay.ColorPart(
    Color.RED,   // 지나갈 경로선의 선 색상을 빨간색으로 지정
    Color.WHITE, // 지나갈 경로선의 테두리 색상을 흰색으로 지정
    Color.GRAY,  // 지나온 경로선의 선 색상을 회색으로 지정
    Color.LTGRAY // 지나온 경로선의 테두리 색상을 밝은 회색으로 지정
);
Kotlin
val colorPart = MultipartPathOverlay.ColorPart(
    Color.RED,   // 지나갈 경로선의 선 색상을 빨간색으로 지정
    Color.WHITE, // 지나갈 경로선의 테두리 색상을 흰색으로 지정
    Color.GRAY,  // 지나온 경로선의 선 색상을 회색으로 지정
    Color.LTGRAY // 지나온 경로선의 테두리 색상을 밝은 회색으로 지정
)
colorParts 속성에 ColorPart에 대한 리스트를 지정하면 색상이 반영됩니다. colorParts의 각 파트는 coordParts에 있는 동일한 순번의 파트에 대응됩니다. 즉, 0번째 좌표열 파트에 대한 색상은 0번째 색상 파트의 값으로 지정됩니다. 따라서 coordParts는 필수적으로 지정해야 하며, 그 크기 또한 colorParts의 크기와 동일해야 합니다. 그렇지 않은 멀티파트 경로선 오버레이를 지도에 추가하면 예외가 발생합니다. 목록에 null인 원소가 있을 경우에도 예외가 발생합니다.
다음은 멀티파트 경로선 오버레이에 두 개의 색상 파트를 지정하는 예제입니다.
multipartPath.setColorParts(Arrays.asList(
    new MultipartPathOverlay.ColorPart(
        Color.RED, Color.WHITE, Color.GRAY, Color.LTGRAY),
    new MultipartPathOverlay.ColorPart(
        Color.GREEN, Color.WHITE, Color.DKGRAY, Color.LTGRAY)
));
Java
multipartPath.setColorParts(Arrays.asList(
    new MultipartPathOverlay.ColorPart(
        Color.RED, Color.WHITE, Color.GRAY, Color.LTGRAY),
    new MultipartPathOverlay.ColorPart(
        Color.GREEN, Color.WHITE, Color.DKGRAY, Color.LTGRAY)
));
Kotlin
multipartPath.colorParts = listOf(
    MultipartPathOverlay.ColorPart(
        Color.RED,
        Color.WHITE,
        Color.GRAY,
        Color.LTGRAY
    ),
    MultipartPathOverlay.ColorPart(
        Color.GREEN,
        Color.WHITE,
        Color.DKGRAY,
        Color.LTGRAY
    )
)
경로선 오버레이 공통 속성
멀티파트 경로선 오버레이는 경로선 오버레이가 지원하는 모든 기능을 지원합니다. 두께, 테두리 두께, 패턴, 진척률, 마커/심벌 충돌 처리 속성을 경로선 오버레이와 동일하게 지정할 수 있습니다.
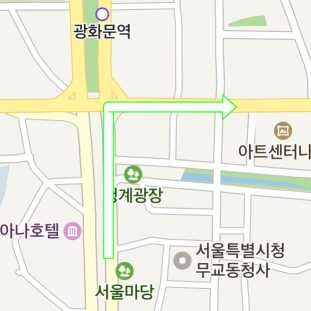
화살표 오버레이
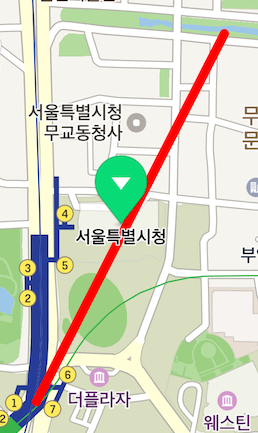
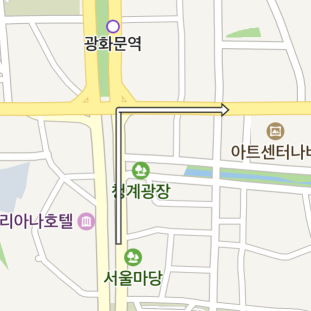
ArrowheadPathOverlay는 화살표 형태로 방향 또는 회전 지점을 나타내는 오버레이입니다. 경로선 오버레이와 마찬가지로 좌표열을 나타내지만 진척률을 지정할 수 없고, 끝 지점에 삼각형 모양의 머리가 추가됩니다.
추가 및 삭제
화살표 오버레이는 일반적인 자바 객체처럼 생성할 수 있습니다. 객체를 생성하고 coords 속성에 좌표열을 지정한 후 map 속성에 지도 객체를 지정하면 화살표 오버레이가 나타납니다. 단, map을 지정하기 전에는 반드시 coords를 지정해야 하며, 그렇지 않으면 예외가 발생합니다.
다음은 화살표 오버레이 객체를 생성하고 지도에 추가하는 예제입니다.
ArrowheadPathOverlay arrowheadPath = new ArrowheadPathOverlay();
arrowheadPath.setCoords(Arrays.asList(
    new LatLng(37.568003, 126.9772503),
    new LatLng(37.5701573, 126.9772503),
    new LatLng(37.5701573, 126.9793745)
));
arrowheadPath.setMap(naverMap);
Java
ArrowheadPathOverlay arrowheadPath = new ArrowheadPathOverlay();
arrowheadPath.setCoords(Arrays.asList(
    new LatLng(37.568003, 126.9772503),
    new LatLng(37.5701573, 126.9772503),
    new LatLng(37.5701573, 126.9793745)
));
arrowheadPath.setMap(naverMap);
Kotlin
val arrowheadPath = ArrowheadPathOverlay()
arrowheadPath.coords = listOf(
    LatLng(37.568003, 126.9772503),
    LatLng(37.5701573, 126.9772503),
    LatLng(37.5701573, 126.9793745)
)
arrowheadPath.map = naverMap
map에 null을 지정하면 지도에서 화살표 오버레이가 사라집니다.
다음은 화살표 오버레이를 지도에서 제거하는 예제입니다.
arrowheadPath.setMap(null);
Java
arrowheadPath.setMap(null);
Kotlin
arrowheadPath.map = null
좌표열
coords 속성을 사용해 좌표열을 지정할 수 있습니다. 좌표열은 필수적인 속성으로, 좌표열을 지정하지 않은 화살표 오버레이를 지도에 추가하면 예외가 발생합니다. 또한 좌표열의 크기가 2 미만이거나 null인 원소가 있을 경우에도 예외가 발생합니다. 가장 마지막 좌표에는 삼각형 모양의 머리가 그려집니다.
다음은 화살표 오버레이의 좌표열을 지정하는 예제입니다.
arrowheadPath.setCoords(Arrays.asList(
    new LatLng(37.568003, 126.9772503),
    new LatLng(37.5701573, 126.9772503),
    new LatLng(37.5701573, 126.9793745)
));
Java
arrowheadPath.setCoords(Arrays.asList(
    new LatLng(37.568003, 126.9772503),
    new LatLng(37.5701573, 126.9772503),
    new LatLng(37.5701573, 126.9793745)
));
Kotlin
arrowheadPath.coords = listOf(
    LatLng(37.568003, 126.9772503),
    LatLng(37.5701573, 126.9772503),
    LatLng(37.5701573, 126.9793745)
)
coords 속성에 지정한 좌표열 객체 또는 coords 속성으로 얻어온 좌표열 객체를 변경하더라도 변경 사항이 반영되지는 않습니다. 반영하려면 좌표열 객체를 다시 coords 속성에 지정해야 합니다.
다음은 화살표 오버레이의 좌표열 중 일부를 변경하는 예제입니다.
List<LatLng> coords = new ArrayList<>();
Collections.addAll(coords,
    new LatLng(37.568003, 126.9772503),
    new LatLng(37.5701573, 126.9772503),
    new LatLng(37.5701573, 126.9793745)
);
arrowheadPath.setCoords(coords);

coords.set(0, new LatLng(37.5734571, 126.975335));
// 아직 반영되지 않음
arrowheadPath.setCoords(coords);
// 반영됨
Java
List<LatLng> coords = new ArrayList<>();
Collections.addAll(coords,
    new LatLng(37.568003, 126.9772503),
    new LatLng(37.5701573, 126.9772503),
    new LatLng(37.5701573, 126.9793745)
);
arrowheadPath.setCoords(coords);

coords.set(0, new LatLng(37.5734571, 126.975335));
// 아직 반영되지 않음
arrowheadPath.setCoords(coords);
// 반영됨
Kotlin
val coords = mutableListOf(
    LatLng(37.568003, 126.9772503),
    LatLng(37.5701573, 126.9772503),
    LatLng(37.5701573, 126.9793745)
)
arrowheadPath.coords = coords

coords[0] = LatLng(37.5734571, 126.975335)
// 아직 반영되지 않음
arrowheadPath.coords = coords
// 반영됨
두께
width 속성을 사용해 두께를 지정할 수 있습니다.
다음은 화살표 오버레이의 두께를 20픽셀로 지정하는 예제입니다.
arrowheadPath.setWidth(20);
Java
arrowheadPath.setWidth(20);
Kotlin
arrowheadPath.width = 20

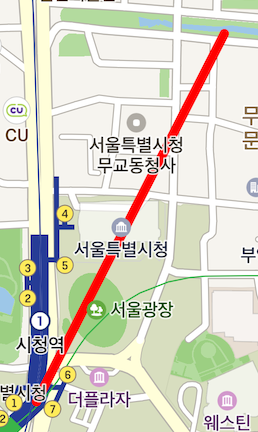
머리 크기
headSizeRatio 속성을 사용해 머리 크기의 배율을 지정할 수 있습니다. 두께에 배율을 곱한 값이 머리의 크기가 됩니다.
다음은 화살표 오버레이의 머리 크기를 두께의 4배로 지정하는 예제입니다.
arrowheadPath.setHeadSizeRatio(4);
Java
arrowheadPath.setHeadSizeRatio(4);
Kotlin
arrowheadPath.headSizeRatio = 4f

색상
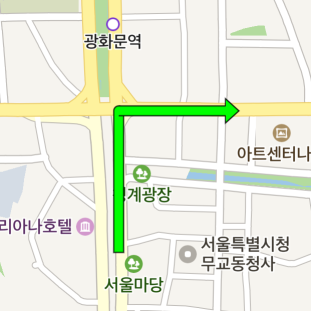
color 속성을 사용해 색상을 지정할 수 있습니다.
다음은 화살표 오버레이의 색상을 녹색으로 지정하는 예제입니다.
arrowheadPath.setColor(Color.GREEN);
Java
arrowheadPath.setColor(Color.GREEN);
Kotlin
arrowheadPath.color = Color.GREEN
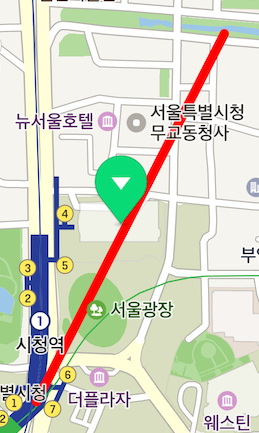
테두리 색상
outlineColor 속성을 사용해 테두리의 색상을 지정할 수 있습니다.
다음은 화살표 오버레이의 테두리 색상을 녹색으로 지정하는 예제입니다.
arrowheadPath.setOutlineColor(Color.GREEN);
Java
arrowheadPath.setOutlineColor(Color.GREEN);
Kotlin
arrowheadPath.outlineColor = Color.GREEN